
Photographing this post really made us realise how dark our hallway actually is! We decided to paint it dark navy too, so you’ll have to bare with us with the photos – but when we’re not trying to navigate the light, we love love love our hallway.
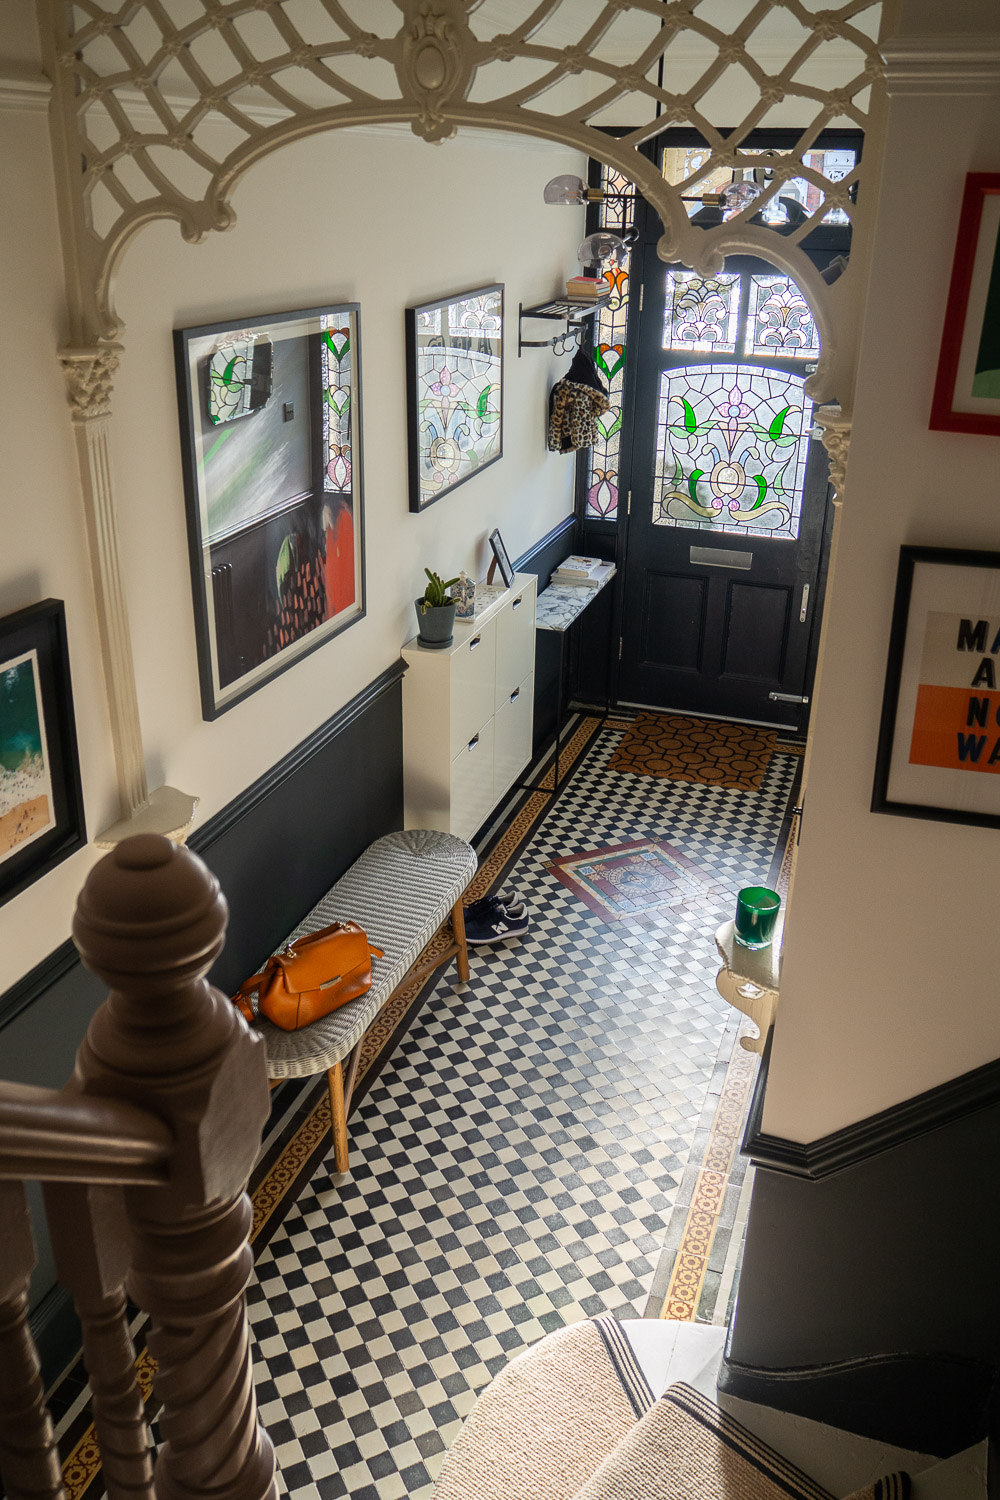
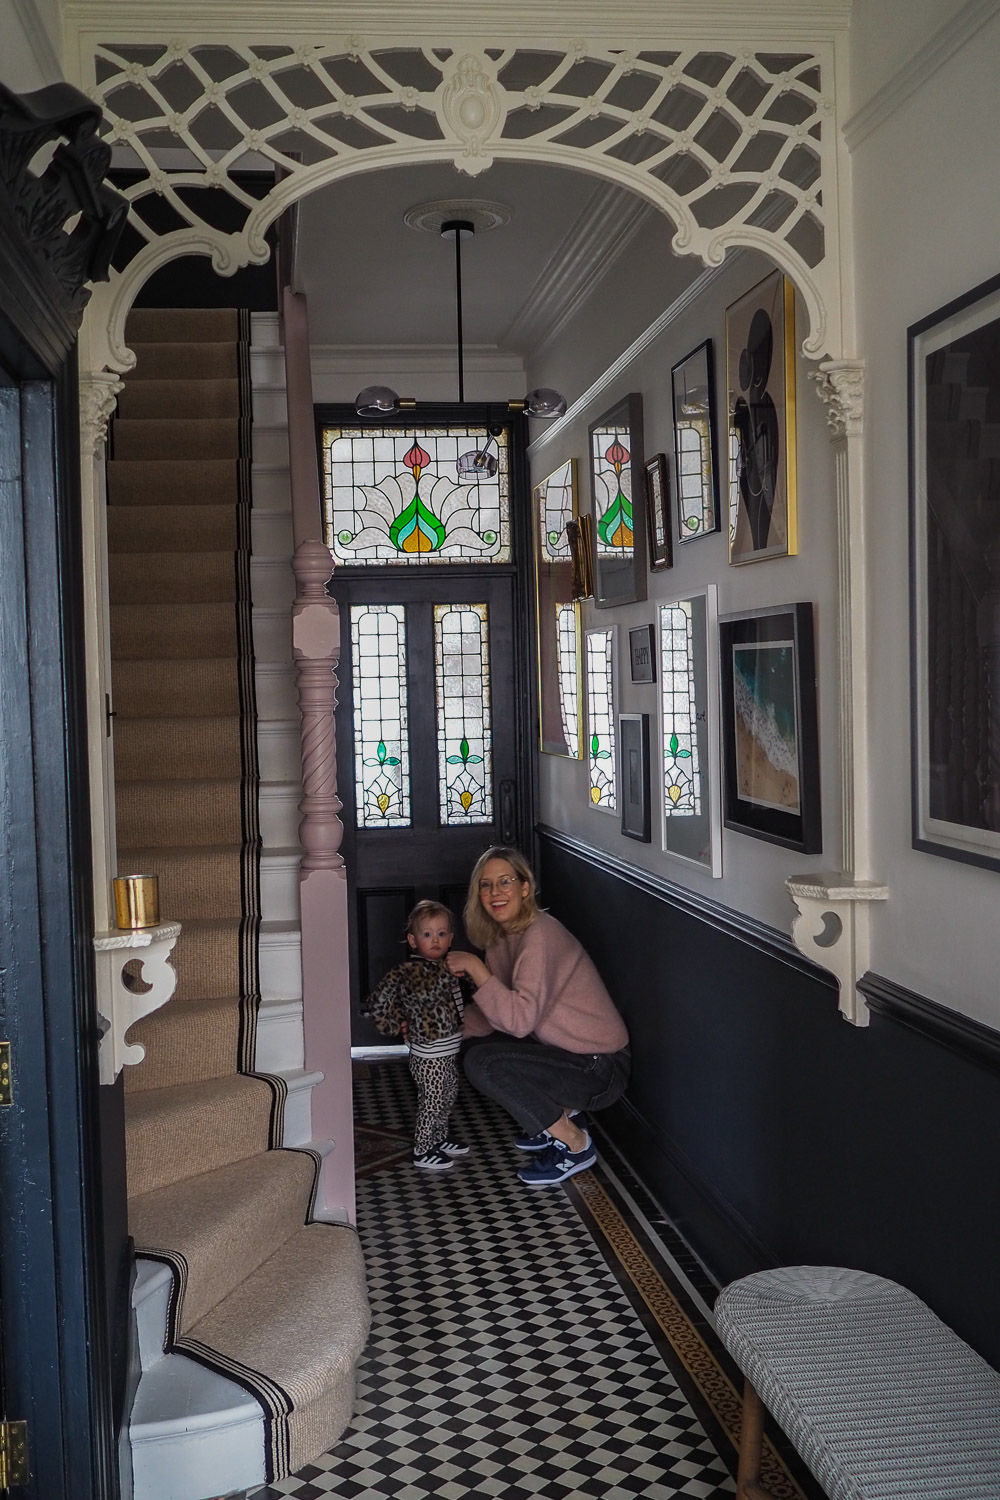
It’s the main reason we fell in love with the house when we viewed it – it takes up most of the floor plan – it’s wide, with the most incredible tiles (even under years of dirt we could make them out), Edwardian period details and wonderful fretwork, and the beautiful staircase sits in the middle of the house. But it definitely did not look as it does now when we viewed it….
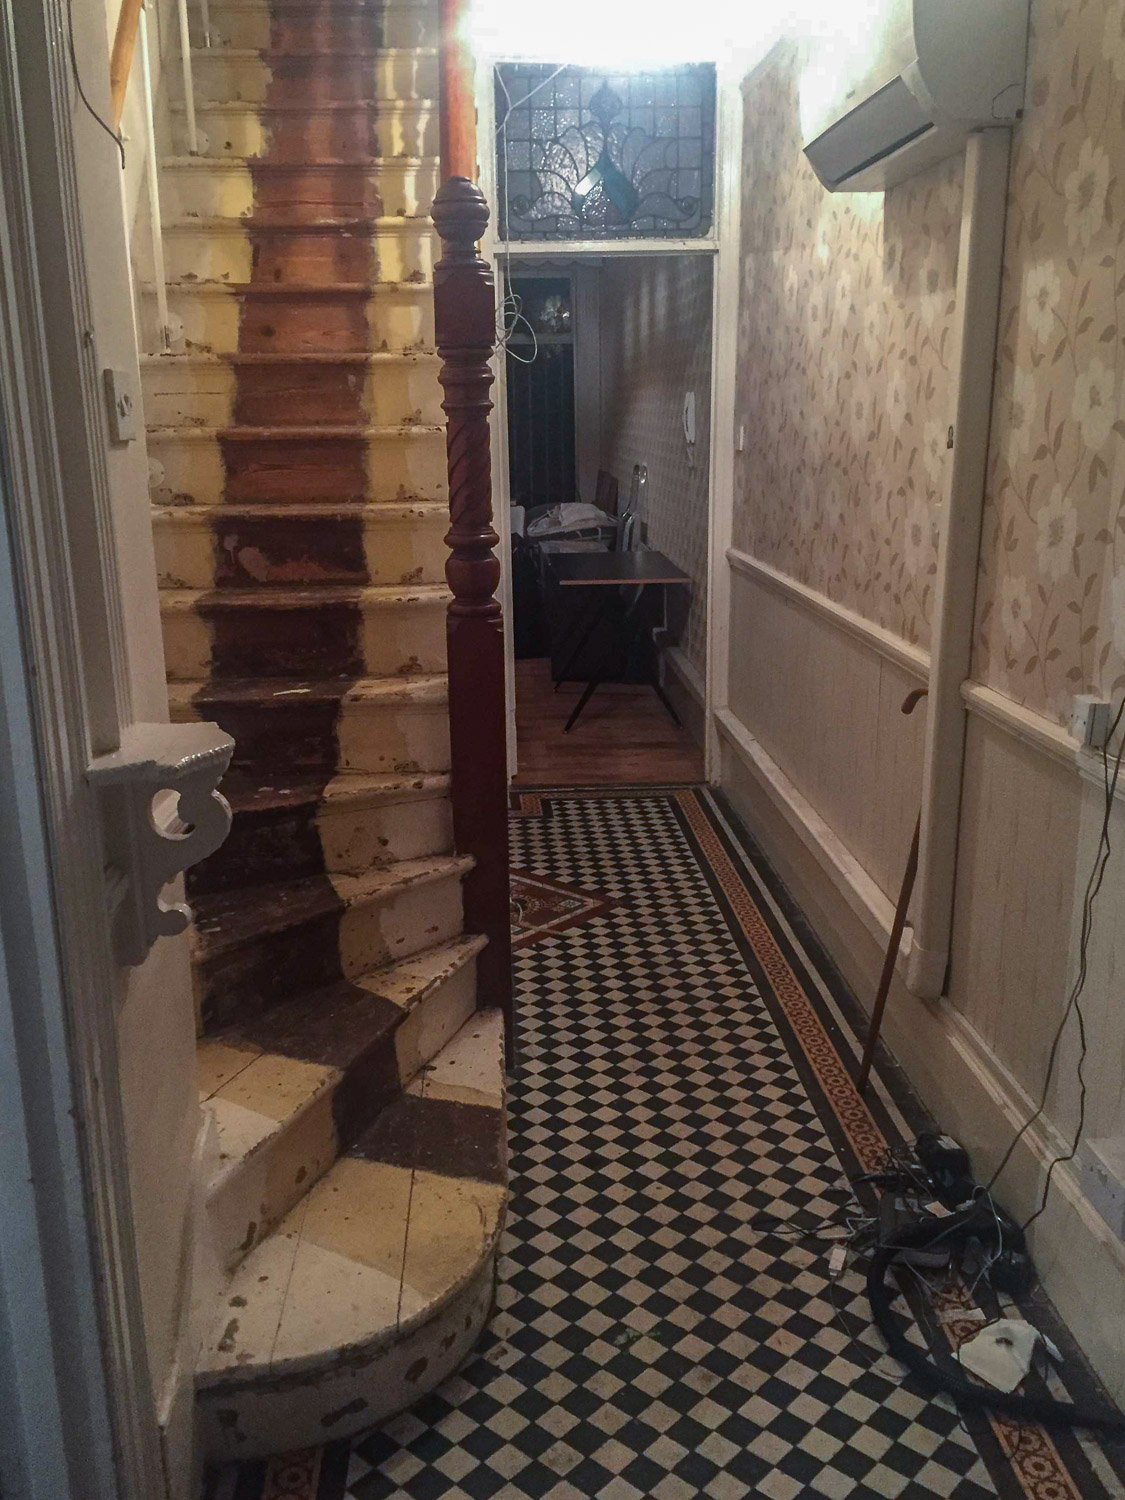
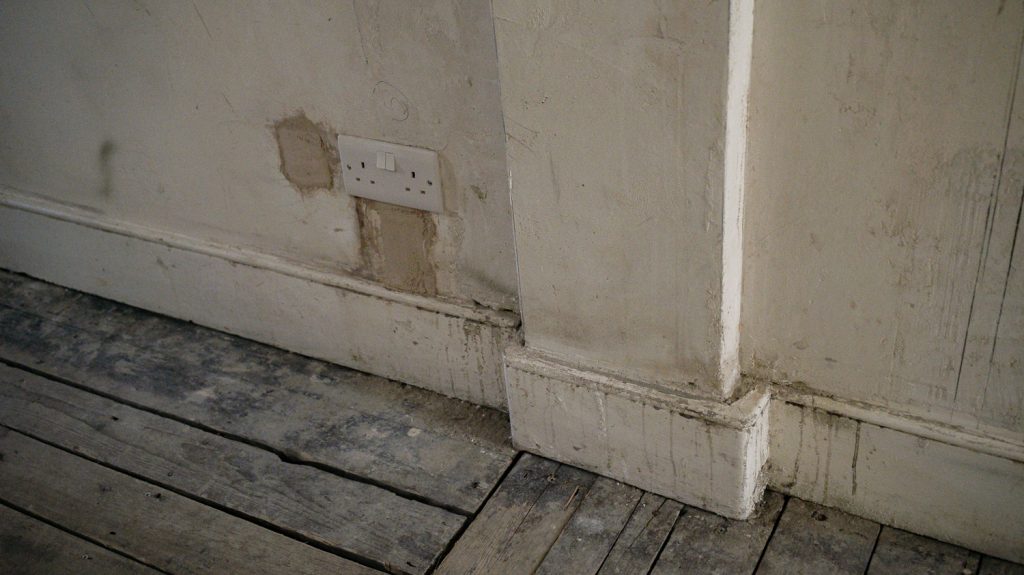
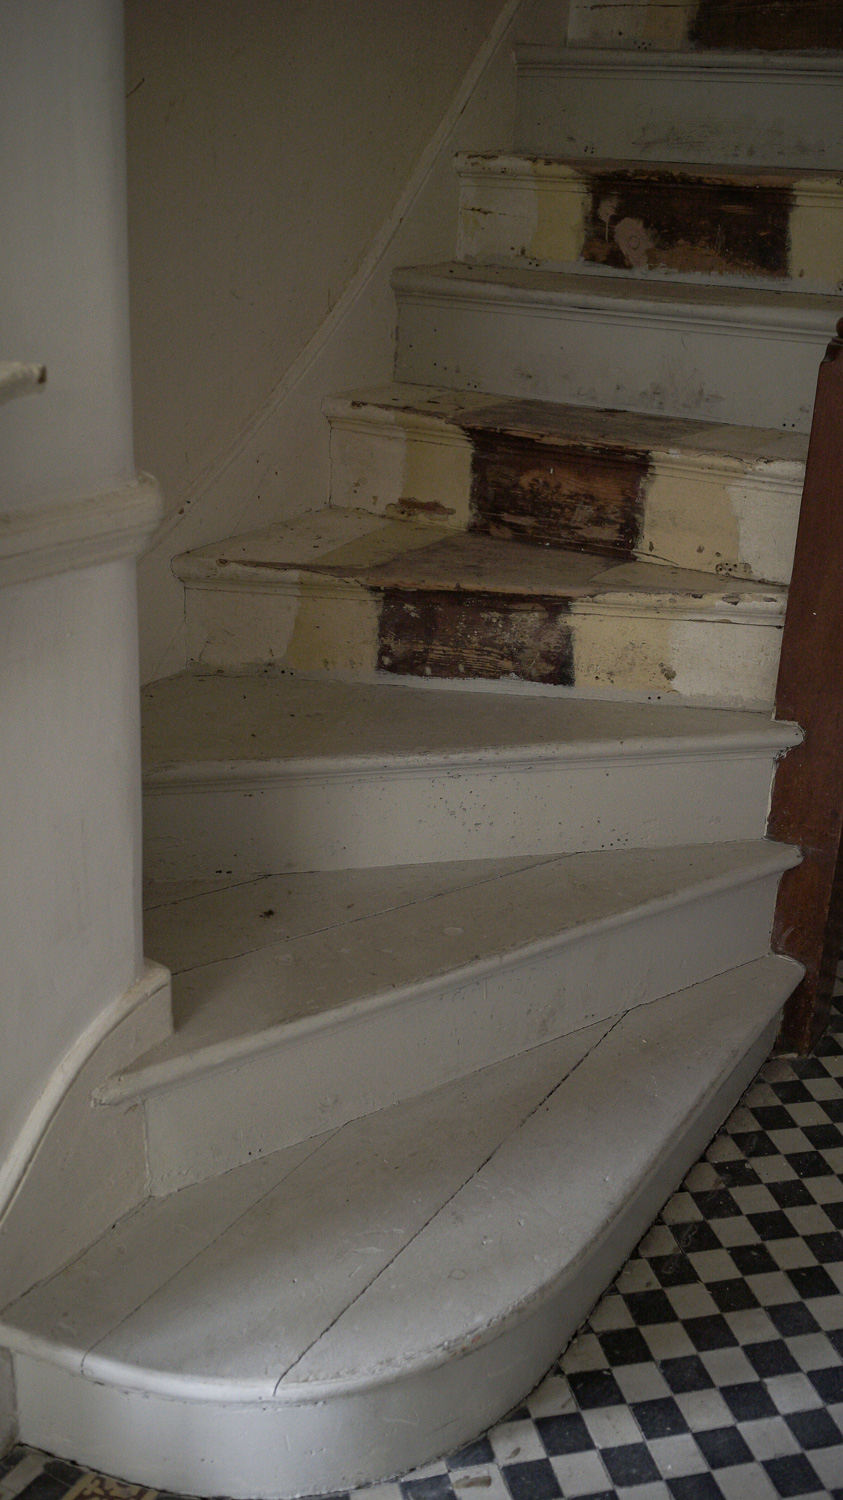
We didn’t take tons of before photos as we moved in immediately, so had to fill the house with our stuff straight away and make it feel liveable, as we couldn’t afford to renovate immediately. I also didn’t want to take too many photos as it reminded me of a tough time – the smell of mildew was bad, we didn’t have a kitchen or a working shower when we moved in so were sleeping in coats and microwaving meals in the living room. The main thing I remember in the hallway was the air conditioning unit attached to the wall, the wires everywhere (and I mean everywhere, most going nowhere, but dangling and glued to so many crevices!), the pipes coming out of the ceilings (there was a working lead tap inside our hall) and the crust of dirt on the skirting boards and walls. We got industrial cleaners in when we first moved but they couldn’t really shift anything.

Over the first year we did small bits – my dad removed the air conditioning unit and a lot of the straggling wires, my mum and I removed the accessibility handles from the stairs, we cleaned the tiles and painted a few stairs to make them feel ‘clean’ (although I gave up after a while as we needed to treat the woodworm and it became one of those jobs that just got put to the end of a long to-do list).
We remortgaged to do our bedroom (read that renovation post here!) and being pregnant, we decided to try and do the hallway at the same time. We did the bedroom and hallway over the kitchen because, for us, it was still more affordable and psychologically, the hallway is such an important part of this house and makes us feel like the house is ‘done’ – as soon as we come home from work, stepping in this hallway now, we don’t feel like we’re living in a renovation project. And actually, now we have painted the kitchen, have a sink and a few portable hobs, it’s totally doable!

It took a LONG time, the building work took around 4-5 months and then, it took a further 18 MONTHS for us to paint everything. We painted it ourselves to save money (we were quoted £5k for painting and to be fair, I can see why as it took us over a year!).
We painted pretty much solidly for 18 months, all the woodwork needed 4 coats, the walls were a huge expanse and the ceilings were high. Now we’re through the other side I admit it feels like we have so much spare time, we spend our evenings watching TV or pottering around the home, which is exhausting enough with a toddler. Having a renovation on the side hasn’t been easy with navigating a new baby but now it feels like a distant memory!
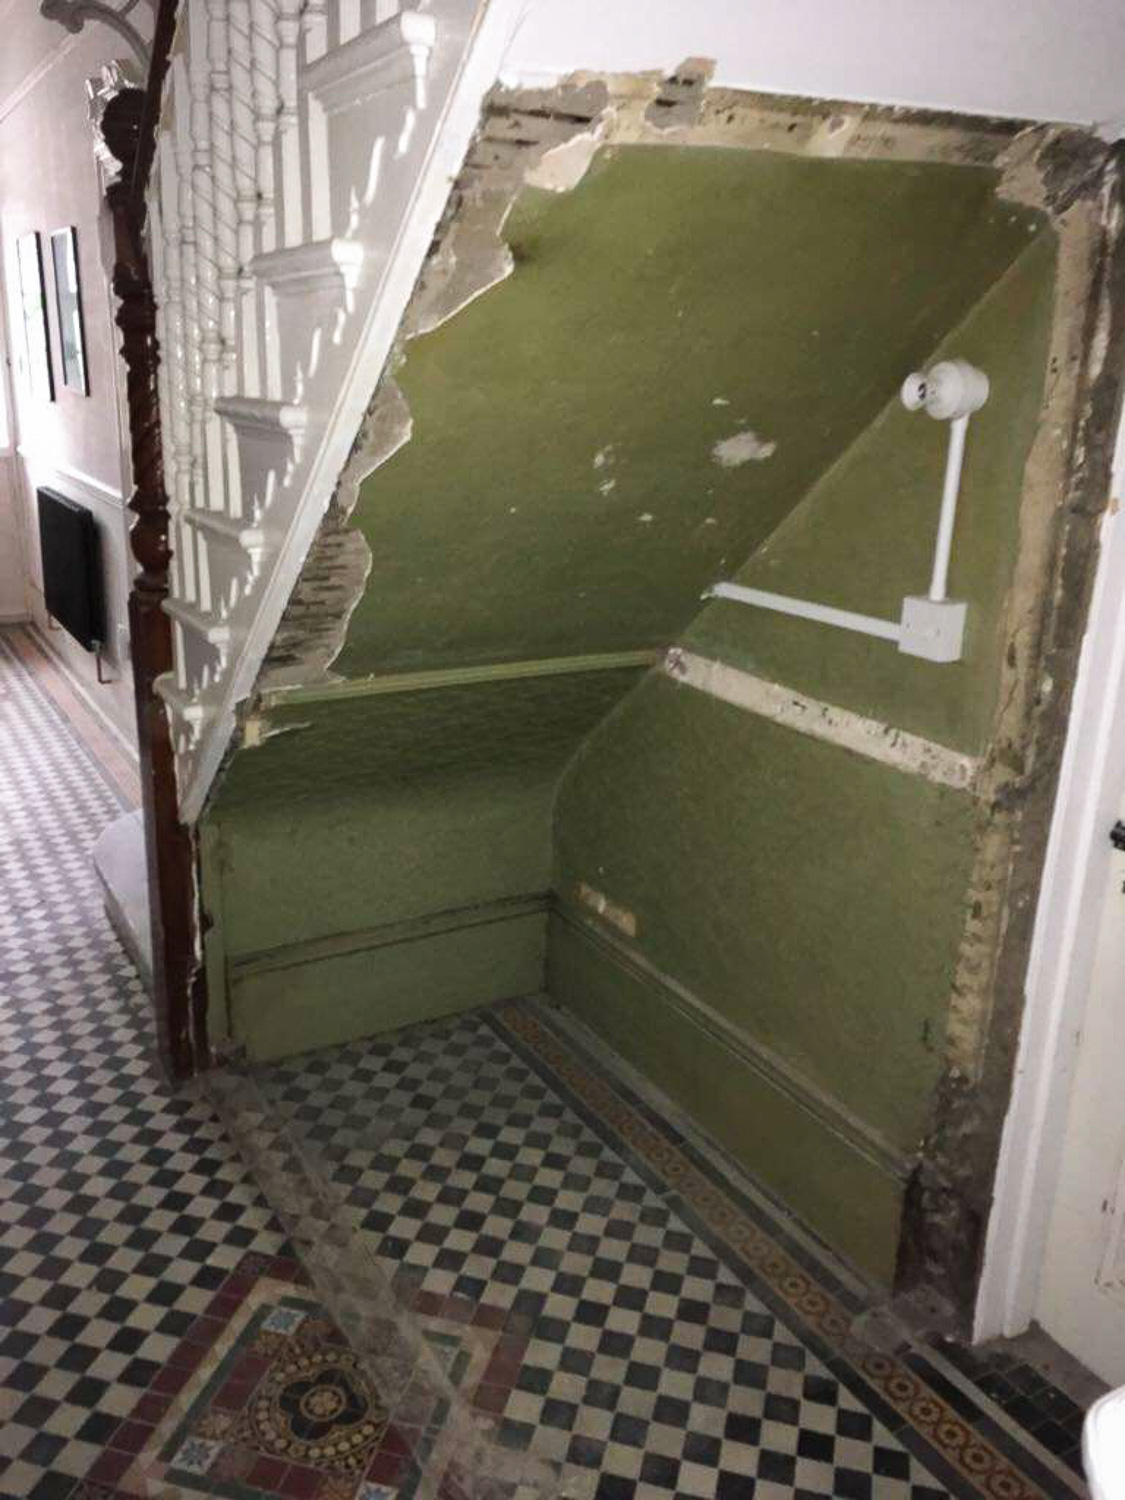

Walls were stripped back and replastered, but we kept skirting and woodwork where we could, sanding it down ourselves to hold onto as many period features as possible. Where things couldn’t be salvaged or had been removed, we replaced with features sensitive to the Edwardian era.


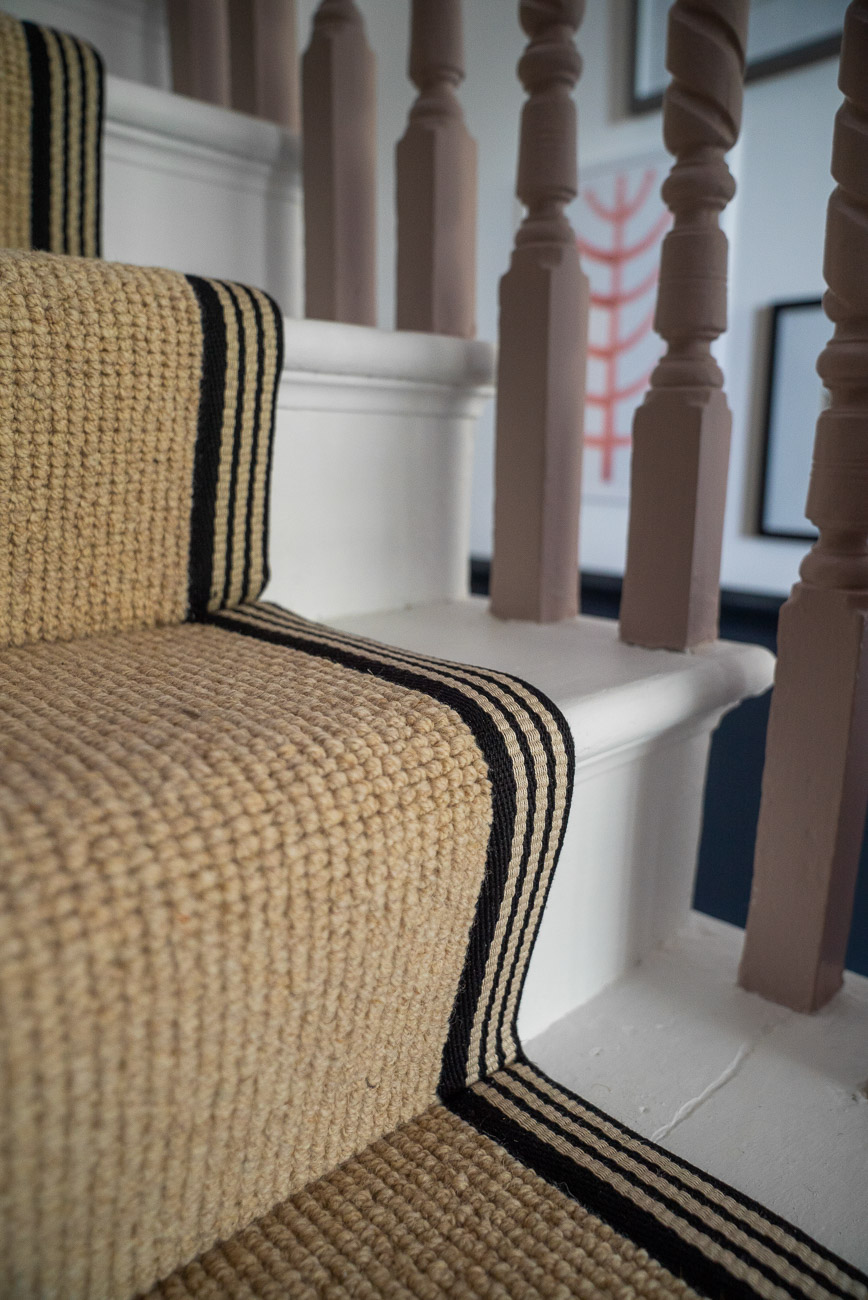
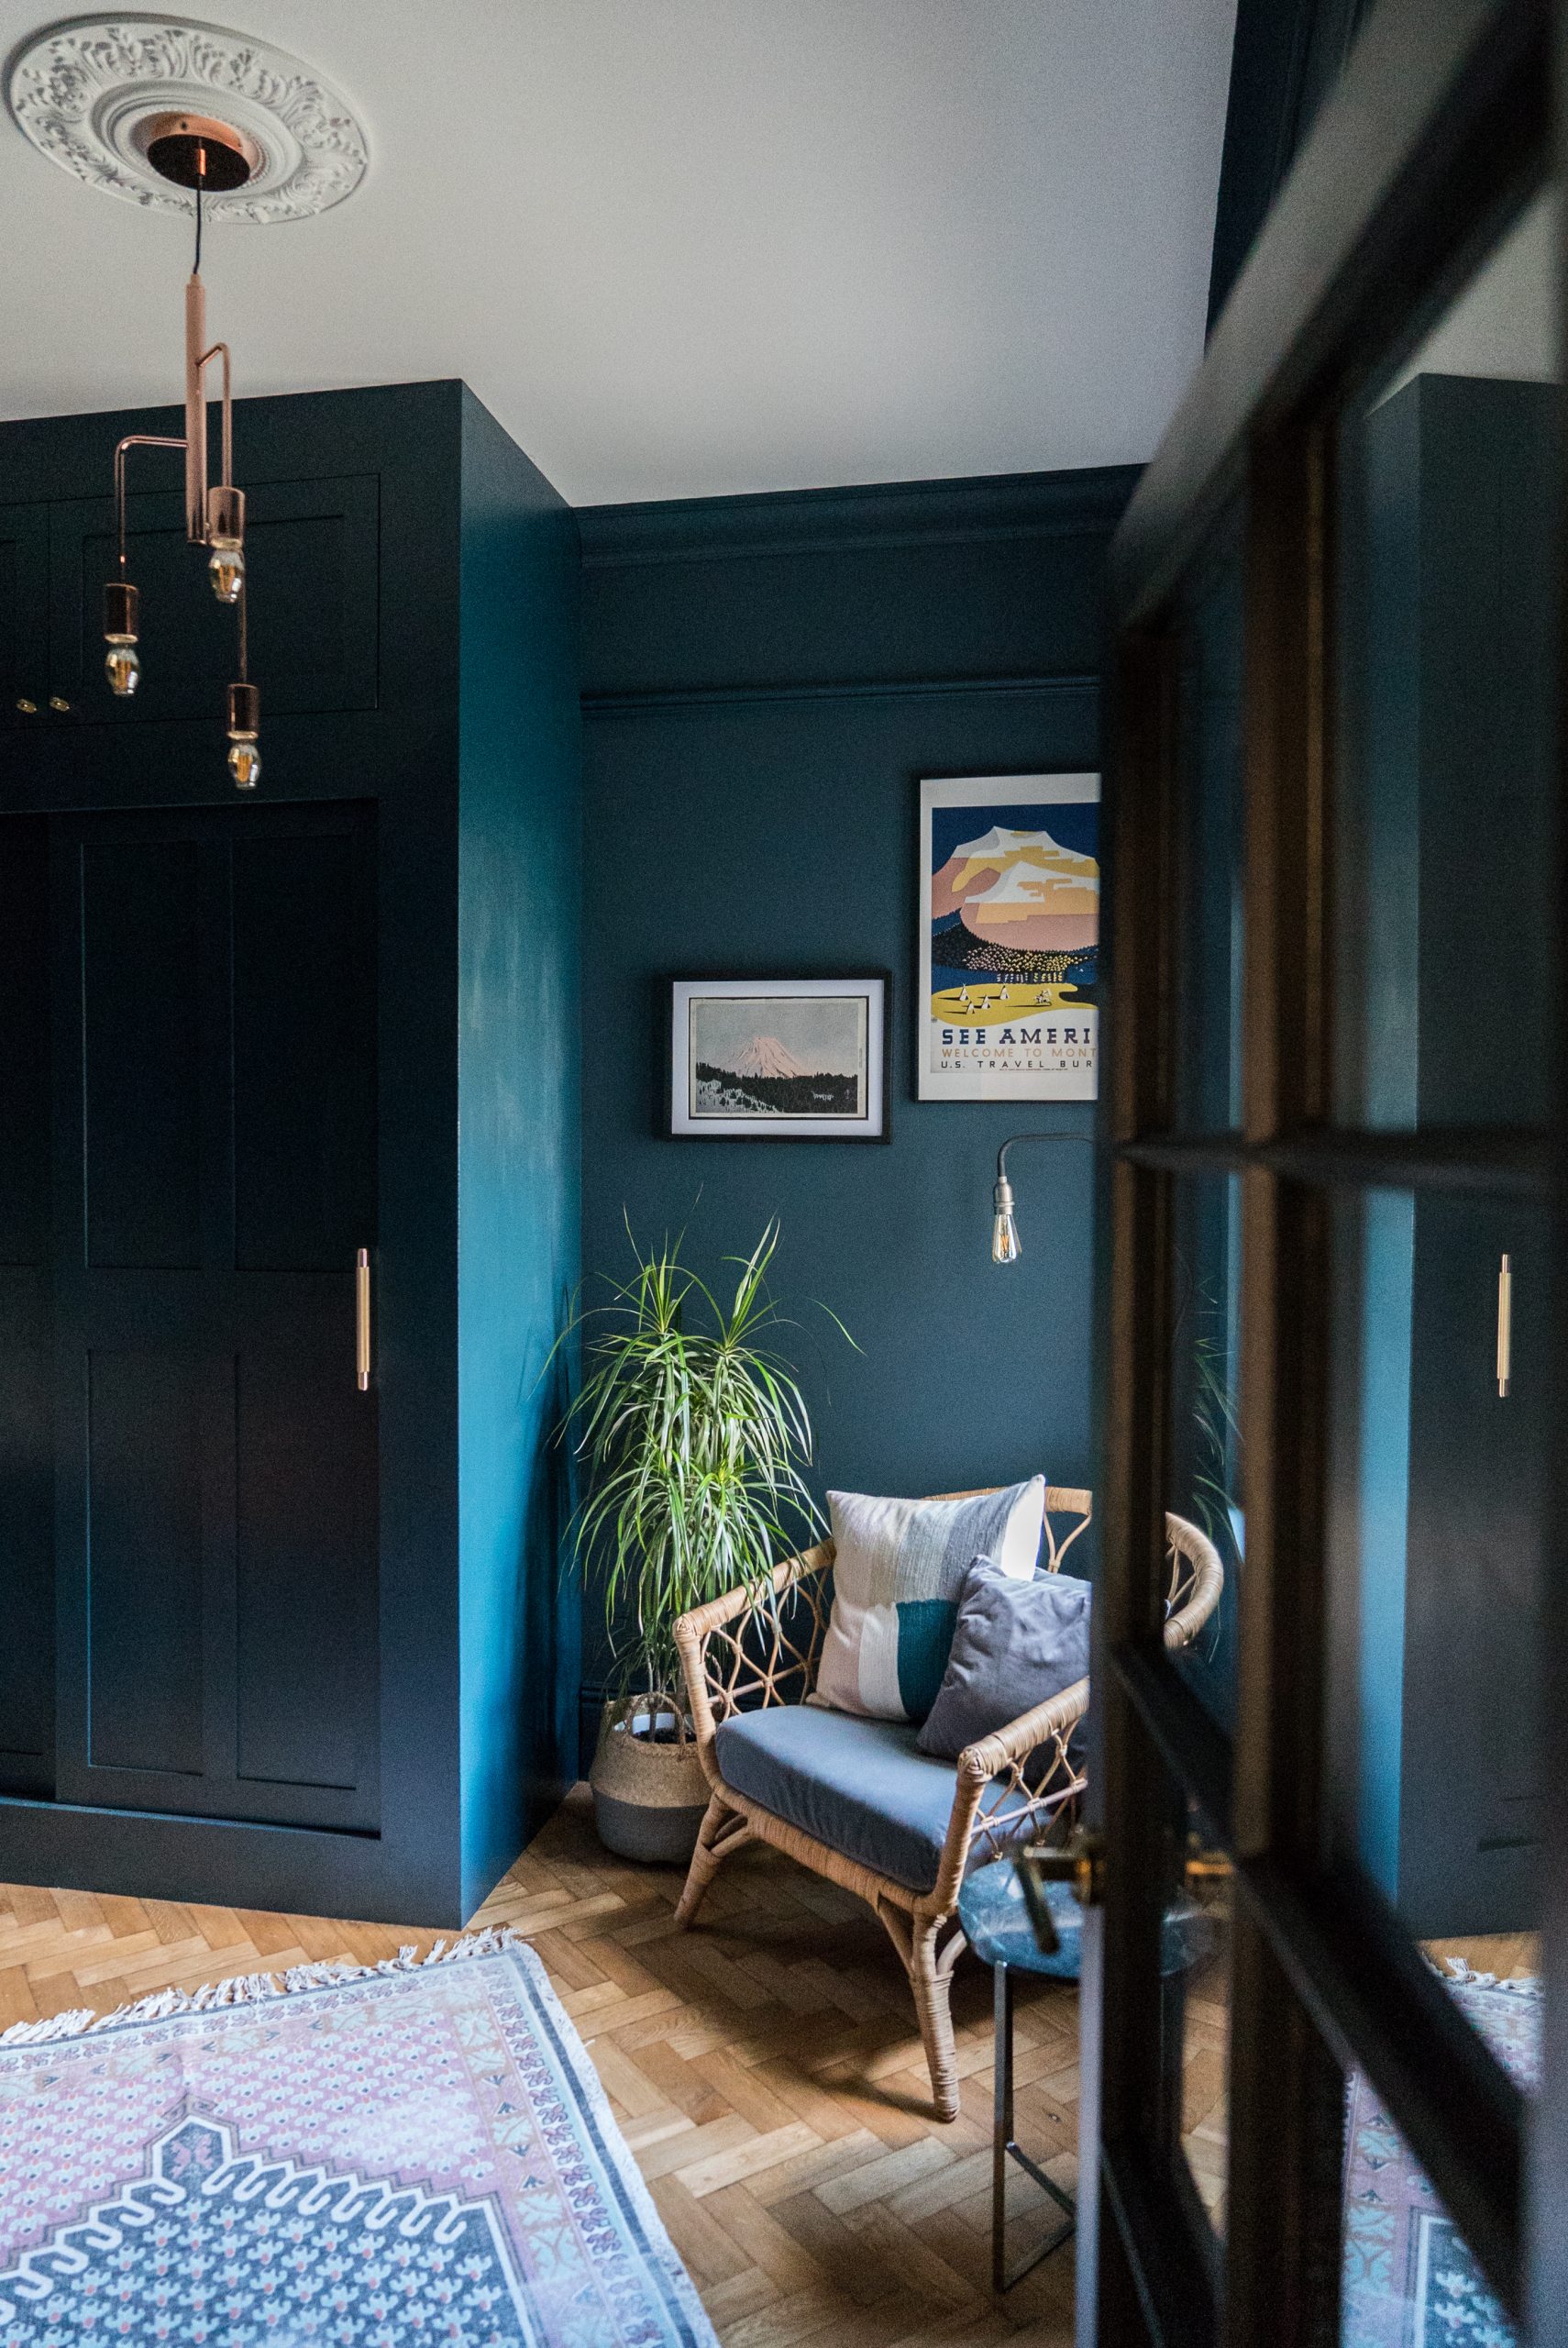
Paint-wise we used Dulux ‘Brilliant White’ for the top half of the walls and ceiling (to help bounce light around the dark room) and Farrow & Ball ‘Railings’ for the bottom half and woodwork (as it was only half of the wall, it made the paint a lot more affordable). For the stairs, we used Little Greene ‘Peach Cherry Blossom 3’ on the banisters (you can read all about the stairs and runner details here).


The floor tiles were in good condition, just very dirty and a few were chipped, but we got them reconditioned and they look fantastic now. The good thing about being in no big rush to finish (we had a baby in the middle so had to manage our expectations a LOT in regards to finishing) was that we waited until we could afford the last steps: floor, carpet, front door. It all got done over 2 years after the works were completed. The front door was finished last week, we found a local guy that reconditioned the existing glass (which needed a lot of TLC) and then fitted a new panel (he had to trace a neighbour’s glass so it fitted in with the road).


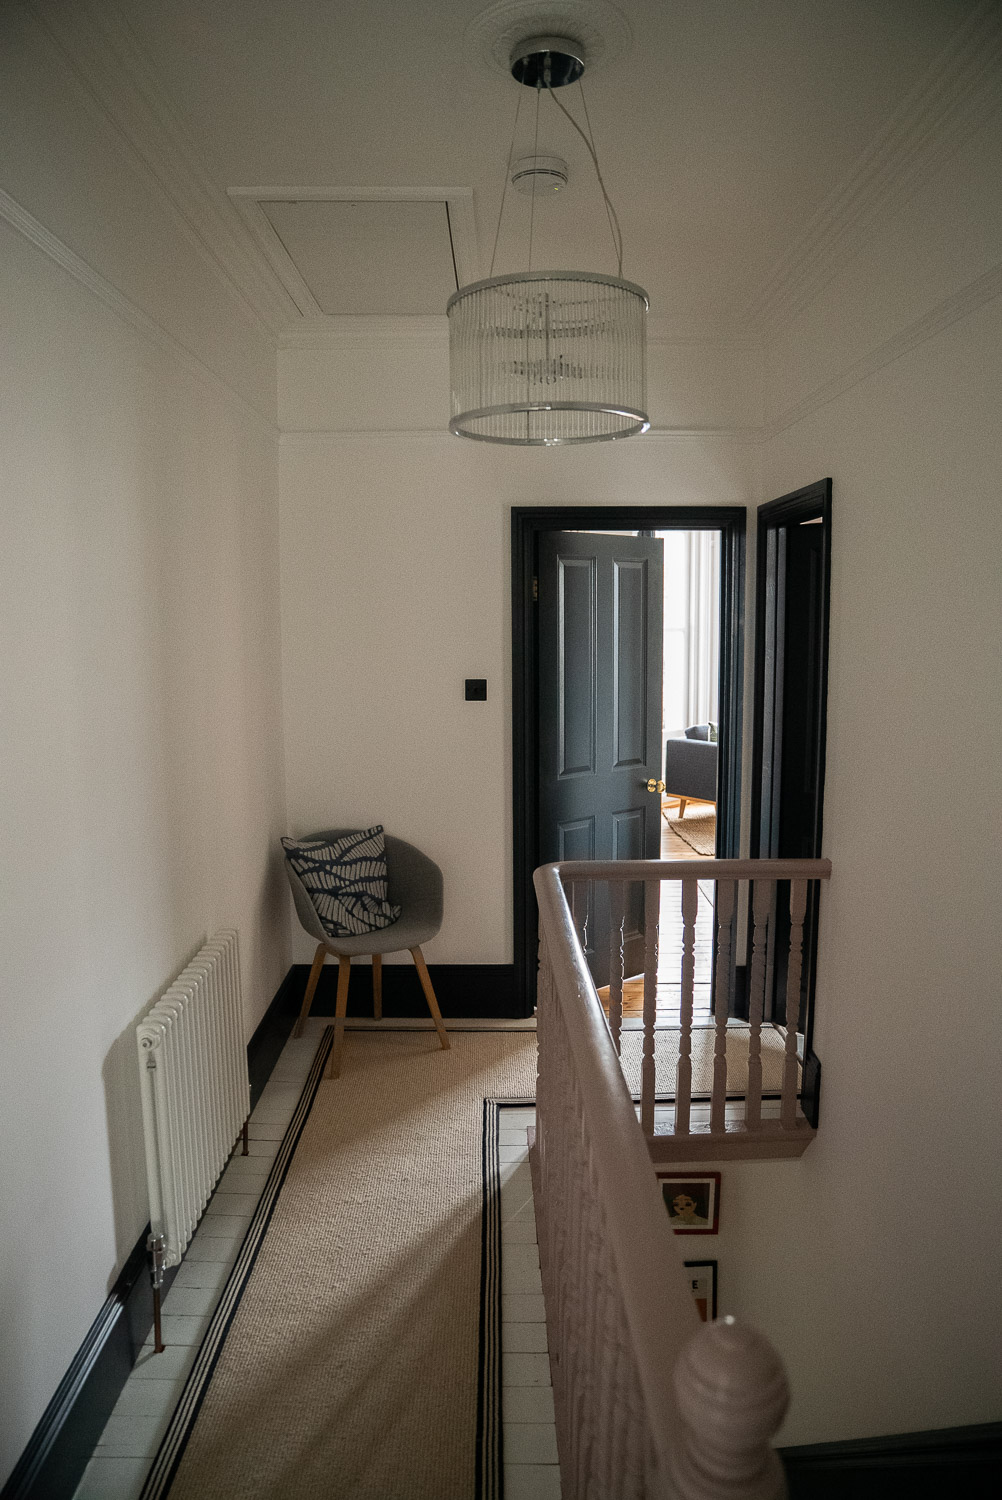


Things we might have done differently? Perhaps lighting – don’t get me wrong, we love these lights but knowing how dark this hallway is now, it could often do with a bit of help in the depths of winter.
But, now the tough times are behind us (filling up a bucket of water from the tap in the hall, in order to fill up the cistern to go to the loo), we wouldn’t change a thing. It feels like home.


You can watch an IGTV tour of the hall below (click on the image or click here).


Oh my goodness!!! I remember when you bought it and how brave you guys were with all the chaos. It looks phenomenal! 🤩🤩
Hi, love the transformation and the fact that you’re honest about how long these things actually take when you’ve got to save the money and have other life things going on! Can I ask firstly what is so messy about getting plaster coving? Some of ours have been replaced with polystyrene which I hate so we will eventually swap them out. Secondly, is there a reason you’ve gone for the real deal paints rather than colour matched which are cheaper? We only began our renovation project 6 months ago and are spending the next few years doing the place up, not anywhere near tape on the hall but still plenty of hidden surprises to deal with and big jobs to do! X
I can so see why the hall sold the house to you, it would so have sold it to me too!
I love what you’ve done, it really brings out the period features. I love them all, but the woodwork is really something else, and amazing that no-one ripped it out in a misguided attempt to modernise.
I can so understand how it makes you feel that you’re coming home to a renovated house, it must make your heart sing every time you walk in the door.
Ours is a new build, but we moved in way before we could properly make it our home. The bathroom was the only room that was finished, no flooring (bare concrete), no wall coverings, no electrics (just extension leads from the cellar), no kitchen. Every time we used the bathroom, we took our slippers off, so not to track dust from the concrete floors onto our clean black tiles. We still have to finish off the woodwork and electrics (guess what my husband does for a living!), but like you we’ve done most of it ourselves, and are really pleased with the results.
Such an amazing transformation. Hard to believe it’s the same house.
I’m really curious about whether you had a vision of what the result could be when you first looked at the house, and how closely the reality resembles that vision. Also, did you have trouble deciding at any point what colors or finishes you’d use?
Oh thank you! xx
Plaster coving was messy because they use water as the adhesive, so the plaster drips everywhere! And in regards to paint, we’ve colour matched in some rooms but to be honest, we like the texture of the paint rather than the colours – estate emulsion has almost a chalky finish which we like. And by only painting half the wall we didn’t need to buy *too* much x
Aah brilliant! It’s funny, I was just talking to Chris and neither of us can barely remember our lives in the midst of it, changing slippers, microwaving food in the living room, all our belongings in the kitchen….! It’s (almost) a distant memory right now x
No, we didn’t really….the period features kind of dictated where we painted with the dado rail, architraves and picture rail etc. We knew we wanted to use ‘Railings’ as we had it in our last flat, and then the white was to lift the light in the room xx
It is so lovely to be able to appreciate your progress with you! It looks lovely!
PS Your renovation tips have been so useful, even in sunny Cape Town where our houses look very different to yours. Thank you for sharing!
Could you share more details about the refurbishing of the stained glass? X
This is fabulous, a testimony to all your hard work. You are lucky to be able to do so much of the work yourself too although it can be disruptive and messy but what a result! The hall will give you such a buzz when you open the door. What’s next Alex? Looking forward already to the next project.
Tricia M.x
And Peggy! The perfect finishing touch! Well done Alex it looks beautiful x
Thank you! So the kitchen will be next!! We’ve remortgaged and getting a date together! x
We used Hands Glass in Finsbury Park, he removed it and took it away to clean and then replaced a few weeks later – made such a difference! x
Oh amazing, so pleased! xx
I just adore every single detail of your hallway; it is such an incredibly beautiful space, and you’ve done such a wonderful job respecting the period features (so amazing that they were still there and in good condition!) but also making it so modern and ‘you’. I especially love the combination of the inky navy with the peach and the neutral runner and chequered floor tiles; just so dreamy!
You constantly have me dreaming of the day we can buy a townhouse and make it ours!
Briony xx
It looks lovely! I have an Edwardian house in South London, so I really enjoyed reading how you made a feature of the period features! Those tiles are stunning!
Thank you so much for taking us on the journey of your beautiful work. Wow. It’s just superb and your calm description belies what must have been extraordinarily hard work. I love hearing and seeing the ideas you have and how you bring them to fruition, including all the links to gorgeous things. You’re fabulous💕
Such an inspiration! We are just about to tackle the hall in our Victorian house (sadly no period features though as the previous owner “modernised” in the 70s). How do you balance renovating with looking after Peggy? I have a 10 month old and never seem to have time for anything whilst she is awake and am so scared to make noise when she is asleep.
Congratulations on the beautiful hallway.
What a fantastic result! I am sure you worked very hard to achieve it and you must feel very proud. Could you please share where you sourced the bench with the half moon ends? It’s fabulous.
It’s House of Fraser, but from last year! x
It has been hard, we would do things like take her out on our own whilst big jobs were getting done, her few nursery days got easier once she started at around 11 months as well, and actually once she turned 18 months we have managed to do stuff around her and after bedtime, as she has become much more independent – it will slot into place, and you’ll almost forget when it did! XX
Thank you xxx
Thanks so much B xxxx
This looks amazing. And well Done for getting it finished with a toddler – we have a lot of half done jobs around the house that I tell myself I’ll do when the little ones are in bed but really…
My big question is what do you do for storage? With two kids we have SO MANY coats and shoes and wellies to put away – I don’t know how to make the hall look neat without industrial built in shelving which seems a project too far at the moment. I would love to hear what you’ve done!
We’ve just got hooks here! I’m going a bit Marie Kondo and just putting away other stuff in her room. The shoe storage is here and then the pink cupboard under the atris houses hats, scarves, keys, umbrellas, nappy change bags etc x
Your renovation is a masterpiece. I’m loving how you respected the original features while making it very functional, modern and elegant . You do have a talent for unexpected color schemes . This is truly inspiring. Also makes me feel a lot better for still having bits to paint three years after moving in ! My own renovation was also borderline nightmarish , but I don’t regret any of it . And you’re totally right about waiting to find exactly the right piece , took me two years to find the right lamps for my bedroom. Xxx
It is so so lovely to see a long project come to a close – especially when the end result looks as beautiful as your’s does! I particularly love the idea of pulling out the cupboard-under-the-stairs so you get the full image with the tiles and it makes the hallway seems a lot more open. Congrats and thanks for sharing!
Hi Alex, I absolutely love your hallway (those tiles!) and particularly love the way you fixed the shoe storage to the wall and didn’t use the legs, can you share how you did that? 🙂
It was a while ago now but I’m prett sure you have to attach the legs to the storage unit, so we just didn’t do that part and hung it from the wall instead! I actually got the idea from my sister! xx
Thank you – yes it really opens up the space (but I miss somehwere to hide paint tins!)
Wow it’s looking good and it gives some Asian houses look with wood work.
Hi Alex – I also live in N22. Please could I ask (a) who reconditioned your hall tiles and (b) where you get your rugs cleaned? Thanks so much, Claire
The tiler was John O’Driscoll – his Instagram handle is @victoriantiling – but I can’t remember who cleaned our rug, sorry! xx
Hiya, your post is quite old so I don’t know if you’ll see this comment but….did you paint the radiator in ‘Railings’? It looks like a really good colour match if not.
Just wondering as I am planning on painting my hallway the same colour under the dado rail and want to avoid having to paint a radiator myself.
Thank you
A.
No we bought them black for sownstairs and white for upstairs! They’re Acova at Screwfix x